The 2014 Fandom Birthday Cake Season kicks off with a little something from Sailor Moon:

This is the first of two requests I’ve gotten for Sailor Moon cakes this year, and because my friend is a member of the Haruka Tenou/Sailor Uranus Appreciation Club (as am I) I decided to do a cake version of her “lip rod” transformation wand.

Recipe notes: I used the full recipe of Deb Perelman’s “Red Velvet Wine Cake” (sans filling), which you might remember from the shark cake. This classy cake seemed like something Haruka and Michiru would eat. The frosting is modified from the berry buttercream for the Wolfsbane Cupcakes; I used (more) cream in place of the berry juice. You could use any cake recipe that yields three round 8-in pans and any frosting recipe large enough to ice that amount of cake. I would stick to cakes that don’t have nuts or dried fruit because they disrupt the structural integrity of the cake when you carve it. I also used Cupcake Cabernet Sauvignon as the wine.
Japan notes: I recommend baking the central ball not in a oven-proof bowl but in a cake pan because of the volume: it may not fit in the moven and if it does, it may not bake through properly. You’ll still get the visual of the wand and with fewer tears.

Equipment
For the batter and frosting
- stand mixer or hand mixer
- silicon spatula
- pastry bags and plain tip
- food coloring
For sculpting the cake
- a small oven-proof glass bowl – I used a 1.5 liter/15 qt bowl (about 7 in. [17.75 cm] diameter at the top and 4 in. [10 cm] at the bottom)
- a six-pointed star cookie cutter* – I used a 4-in. cutter (point to point)
- a small cake pan – I used a 6 in. (15.25 cm) round pan
- a heart-shaped cake pan or cookie-cutter– used a 4×4-in (10x10cm) springform heart -shaped pan across the widest part and the axis/tips of the heart
- another small cake pan or ramekins for extra batter
- a wire cooling rack
- a large chef’s knife or bread knife
Procedure
- Preheat the oven to 325ºF/160ºC.
- Grease the pans well, especially the bowl.
- Divide the batter between the glass bowl, small cake pan, and heart-shaped cake pan, filling each about 3/4 full. Fill the ramekin(s)/other pan with any leftover batter.**
- Bake–this will depend on the size of your pans and your oven. I baked the heart-shaped pan for 35 minutes, the small round pan for 45 minutes, and the bowl for about 90 minutes, until a tester came out clean.
- Let each cake rest for 10 minutes before inverting onto the rack.
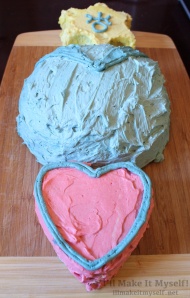
- Make the frosting. Divide into separate bowls: ~1/4 for the yellow star; ~1/4 for the pink heart [ed. I inverted the colors to make it stand out]; ~1/2 for the blue orb + some of that for the darker blue stripes on the orb and heart.
- When the cakes are completely cooled, frost. There’s plenty of frosting, so do a crumb coat first. I used a metal spatula to move the smaller cakes around to assemble.
- Level the heart and flip it upside down to frost in pink with blue piping.
- Level the half-sphere and flip it upside down. Carefully use the knife to remove the flattened edges at the top and make it more spherical. Pipe on the ridges of the orb in darker blue.
- Level the top of the small round cake. Center the start cookie-cutter on it and carefully push down. My cake was thicker than the cookie-cutter, so I cut out the outer pieces with a knife and gently removed them. Frost in yellow. Use some of the extra blue frosting to pipe Sailor Uranus’s symbol onto the star.
- Arrange with the star on “top,” then the orb, then the heart.
Notes
*I used a Star of David one; I actually had one of these in Japan that came with my other winter-themed cookie cutters. If you can’t find one, you could also make your own stencil to use as a guide.
**I filled all my pans very full and it was unclear if they would ooze out. They did not, but it was a little close. If you suspect you over-filled the pan, add a cookie sheet underneath to catch any spills (conventional oven) or line the cooking pan with parchment paper (oven range).

3 Comments
Comments are closed.