Remember how I needed a fix?

This was a really, really good fix.

This cake is a gift!
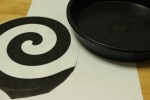
(Spoiler-free!) I am new to Teen Wolf and its fandom, so, having only seen a couple episodes for reference before I started, I lacked a mind palace1 full of semi-obscure references to incorporate. Thank goodness for my friend who suggested the triskelion design, especially since I’m much better at cutting/building cakes than decorating them in the traditional sense. (I plan to invest in lessons at some point so you don’t have to suffer through too many more of my awkward frosting attempts.) The triskelion is a Celtic symbol of three interlocking spirals; in Teen Wolf, it first shows up in Season 1 as a tattoo on Derek Hale’s back.
My challenges for this cake were as follows. 1. Make dairy-free frosting (and cupcakes) so our lactose-intolerant friend could enjoy it safely; 2. cut a triskelion out of cake but still have enough to feed about 10 people; 3. transport said cake to a restaurant and then to a bar (the staff had graciously agreed to let us bring in our own cake).
Thoughts on the show: The cake did not turn me into a full-blown fangirl, but can I just say how much I like Stiles? If I were in a wacky supernatural adventure, I’d want to be the person chucking lacrosse balls at my friend for science. (I’m nearly done with Season 1, so please don’t spoil me!)


Preliminary Notes
On the cake: this makes a LOT of batter. I had to use my giant soup pot instead of a bowl. I baked the cake in three 8-in/20-cm round pans one at a time (because my oven range is Japan-sized). Using wax paper really helped with the removal and transport of the cakes to the cutting area. I get baking chocolate from Diamond in Omicho Market, but if you cannot find enough baking chocolate in the baking section of your grocery store, you can use regular chocolate bars (Meiji, Morinaga, etc.), especially since German chocolate cake uses sweet chocolate. Cream of tartar can be found in the baking section of larger grocery stores in Japan.
On the building: my husband and I estimated the dimensions of the finished cake based on the size of our three cake pans; we then found a box and a piece of plywood which we cut to fit the box. We covered the plywood with plastic wrap, then set down a bunch of strips of wax paper so that after the cake was being arranged and frosted, I could pull out the strips so there would not be as many crumbs or drips of frosting. After I finished decorating it, I let the frosting harden and covered the cake with more plastic wrap, then slid the plywood into the box and carried it to the restaurant. Some friends had a designated driver to go home after the bar, so I sent it from the restaurant to the bar with them.
On the frosting: this non-dairy buttercream frosting recipe is incredible. Getting that much powdered sugar at once in Japan can be tricky, but I found a couple stores with larger (150-g and 500-g) bags. 70-g bags are standard. I liked that I didn’t have to use the stove for the frosting, which is hard if you’re cooking alone. I bought a nice JAS margarine with no additives or dye, but I’ve only seen that brand in the grocery store under M’Za. If you have trouble getting access to good margarine or are not worried about the frosting being dairy-free, you can use your favorite chocolate buttercream recipe.
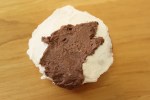
On decorating: To frost the cupcakes, a knife works well, but since the cake is rather flat and crumby, I would recommend piping on the frosting with a flat tip. In Japan, the tips are sold with the pastry bags. I had some trouble with just a knife, as you can see from the irregular thickness of the frosting, but it can be done!
On the cupcakes: These tasted great but got squeezed in the middle and fell a bit–I’m not sure if they fell because I didn’t whip the yolks long enough or because my moven only has 10 degree (C) increments or if they would do better in metal muffin tins instead of the silicon ones I used. The ones that turned out best were in the silicon muffin mold instead of the free-standing cups. I’m going to link the recipe but since you only need one cupcake (and it’s optional), you can certainly use any cupcake recipe you like for the centerpiece. One that yields 6-12 would be sufficient, depending on how many guests you have.
Main Cake: German Chocolate Cake
Adapted from The Joy of Cooking (2006 ed.)
Yields 3 20- or 22-cm (8- or 9-inch) round layers
Serves 8-10 (when cut into shape)
Time:
Active (batter): 30 minutes
Inactive: 30-105 minutes, depending on the size of your oven
(25~35 min if you can bake all the pans at once, or 25-35 minute per pan if you cannot)
Ingredients
270 g (2.25 US cups) cake flour, sifted (hakurikiko, 薄力粉)
1 teaspoon baking soda (bêkingu paudâ, ベーキングパウダー)
1/2 teaspoon salt (shio, 塩)
100 g (4 oz.) sweet baking chocolate, finely chopped (chokorêto: seikayô suîto;チョコレート:製菓用スイート)
120 mL (1/2 cup) boiling water
1 teaspoon vanilla (banira essensu, バニラエッセンス)
240 mL (1 cup) plain yogurt (yôguruto, ヨーグルト)
225 g (1 cup/2 sticks) unsalted butter, at room temperature (muen batâ, 無塩バター)
400 g (2 cups) sugar, divided (guranyûtô, グラニュー糖)
4 eggs, separated (tamago, 卵)
1/4 teaspoon cream of tartar (kurîmu obu tâtâ, クリームオブターター)
Equipment
3 20- or 22-cm (8- or 9-inch) round cake pans (kêki gata, ケーキ型)
Wax- or parchment paper (kukkingo shîto, クッキングシート)
A way to boil water
Sifter (for flour) (furui, ふるい)
1 small heat-proof bowl
2 medium bowls
1 very large bowl (or even a pot)
Electric mixer (hando mikisâ, ハンドミキサー)
Silicon/plastic spatula (shirikon hera , シリコンヘラ)
Procedure
Preheat the oven to 175°C (350°F)–if you are using a conventional oven that takes a while to heat, start preheating at the beginning; if you are using a Japanese oven range, begin heating during the egg white step (#7).
1. Sift the flour, baking powder, and salt into the medium bowl. Set aside.
2. Combine finely chopped baking chocolate and boiling water in the small bowl and stir until the chocolate is melted and smooth. Add vanilla.
3. In the large bowl, beat the butter until creamy, about 30 seconds. Gradually add 350 g (1.75 cups) sugar and beat on high speed until light and fluffy (4-6 minutes.)
4. Beat in egg yolks one at a time.
5. Change to low speed. Add in the chocolate mixture in 3 parts, alternating with yogurt and flour mixture. Beat until smooth and scrape down the sides of the bowl with the silicon spatula as necessary.
6. Set the batter aside. Wash and dry the beaters. In a medium bowl, beat egg whites and cream of tartar on medium speed until soft peaks form. Gradually add the remain 50 g (1/4 cup) of sugar, beating on high speed.
7. Beat until the peaks are stiff but not dry. Use the spatula to fold in 1/4 of the egg whites, then the rest.
8. Divide the batter equally among the pans and spread evenly.
9. Bake at 175/350 for 25-30 min (larger pan) or 30-35 min (smaller pan). When cooled, slide a thin knife around the edge to loosen the cake, then invert onto a rack. Remove wax paper, but set aside for later to transport the cakes for cutting.
Dairy-Free Cupcakes: Lemon Olive-Oil Cake
This recipe from Epicurious made about 18 cupcakes. Other than that, I changed nothing (see notes at top). You can use any cupcake recipe you like for the cupcake, but if you’re only planning to make a few, use a cake recipe that yields 6-12.
Vegan Chocolate Buttercream
Adapted from “Vegan Buttercream Icing Recipe” from The Kitchen Magpie.
Karlynn Johnston recommends the Canadian brand Bechel, but, since I’m in Japan, I used 大池を守る会 (ôchi wo mamoru kai) “white margarine,” which is additive- and GMO-free. The flavor is like real butter, and However, I’ve never seen it in a regular grocery store, just the M’Za basement gourmet supermarket. Readers, do you have a Japanese margarine brand you like that tastes like butter?
As for the milk, rice milk is not readily available in Kanazawa, but the grocery store on the second floor of Kanazawa store sells almond-flavored soy milk, so I used that. That can be hard to find, too; the best tasting soy milk I’ve found is Kibun [紀文] brand, so that might be worth a try, especially since you’ll be adding chocolate powder.
Time: 10-15 minutes
Ingredients
200-225 g (1 cup) [really good] margarine (mâgarin, マーガリン)
3 tsp vanilla (banira essensu, バニラエッセンス)
480 g (4 cups) powdered sugar (paudâ shugâ, パウダー・シュガー; konazatô, 粉砂糖)
1-3 tsp almond-flavored- or regular soy milk (almond soy milk: âmondo tônyû shokuryô, アーモンド豆乳食料; soy milk: tônyû, 豆乳)
50 g (1/4 cup) Dutch process/pure cocoa powder (dacchi kokoa paudâ, ダッチココア・パウダー; or jun kokoa, 純ココア)
Equipment
Sifter (furui, ふるい)
Electric mixer (hando mikisâ, ハンドミキサー)
Silicon/plastic spatula (shirikon hera , シリコンヘラ)
1 large bowl
1 medium bowl
1 small bowl
Procedure
1. Sift cocoa powder into the small bowl and powdered sugar into medium bowl; set aside.
2. Beat margarine with the mixer until fluffy.
3. Slowly add the sugar.
4. Add vanilla.
5. If the consistency is too thick, add a teaspoon of the soy milk and mix again.
6. Here, I frosted the cupcakes in the vanilla frosting, then mixed the cocoa powder into the rest of the mixture.
7. Decorate immediately or refrigerate until you are ready to decorate. You will need to let the frosting warm up a little at room temperature before decorating if the latter.
Assembly
Time: Depends on cooling and your frosting skills. Give it at least an hour if the cakes are cool and the frosting is made.
Equipment
Print out of the spiral sized for your cake pan, cut out
The wax-paper rounds from baking (or new ones if applicable)
3 large plates or cookie sheets
A bread knife (pan kiri naifu, パン切りナイフ)
A sharp paring knife
A silicon spatula
A cookie sheet, piece of stiff cardboard, plywood, etc., to form the base–cover with paper or plastic wrap
A pastry bag and flat tip (pastry bag: shibori bukuro, 絞り袋; tip:
A butter knife
Toothpicks (yôji, ようじ)
1. Print out one arm of the spiral with a portion of the center sized so that it’s just smaller than the cake pan. Trace the pan over it, then cut off the spiral. (The center of the spiral will be formed from part of the leftover cake from cutting.)
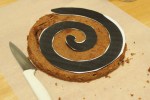
2. If the top of cakes are uneven, gently slice off the raised parts with the bread knife.
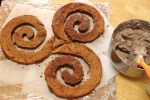
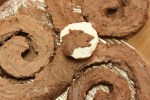
3. Place the wax paper on top of the cake, then flip over onto a plate. Using the paper spiral as a guide, cut along the pattern with a sharp paring knife. Carefully remove the inner spiral in pieces, leaving a big piece from the end to form the center of the triskelion. Repeat for all cakes.
4. On the prepared base board, arrange strips of wax paper to put out from until the cake after decorating (to remove crumbs and stray frosting).
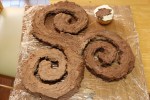
5. Carefully slide the spirals of cake onto the base and carefully arrange them into the triskelion.
6. Cut one of the extra pieces of cake into the shape of the gap in the center.
7. Pipe the frosting over the cake, smoothing it with the butter knife if necessary.
8. If using the cupcake, trace the shape of a wolf (or a moon, etc.) onto the frosted cupcake, then pipe on the chocolate frosting. I did some detailing with a toothpick.
9. Affix the cupcake in the center of the cake with a toothpick.
Note
1 I prefer to think of mine as an old-school library filing cabinet.

3 Comments
Comments are closed.